

Copying or Drafting a Shirt Pattern from an Existing One
Copying or drafting a shirt pattern from an existing one is a great way to create personalized clothing. Whether you’re trying to replicate your favorite shirt or customize a design, this process allows you to tweak every detail. In this post, I’ll guide you through the steps I used to copy a ready-to-wear from Dillard’s.
Choosing a Shirt for Copying
The first step is selecting the shirt you’d like to copy. I had gone to Dillard’s last summer when I felt like I needed a fashion refresh. I waited until the end of summer when sales were at their finest.


This is the shirt I purchased. We were on a road trip up to Phoenix to see a baseball game, Dodgers vs Diamond Backs. I didn’t wear this to the game, but I wore it other places we visited. More on stuff to do in Phoenix, in future blogs. I got so many compliments when I wore the shirt; I thought this was a winner.
Sewing Education That Helped
In September, I took two Zoom classes sponsored by the American Sewing Guild:
-
The Great Rub Off with Jennifer Stern
In February, I signed up for a virtual sewing class at Glow High Fashion entitled The Sew-Ready Pattern Making Master Class, led by Nancy Tauber, who lilts a stunning British accent making the entire class so enchanting.
The combination of the three classes gave me an aha moment. Sustainability was key in my mind to use fabrics from my stash.
The Spark of An Idea
My exercise room has many of my art supplies and bins of fabric. One afternoon while riding my stationary bike, I saw the shirt and my fabric scraps. An idea was born!
Step 1: Sketch and Study
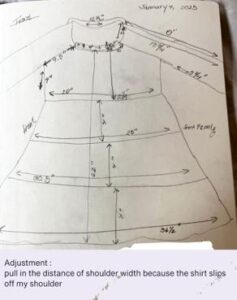
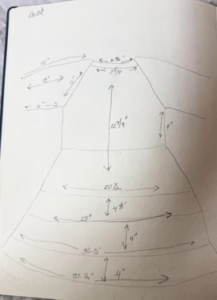
The first thing I did was make a schematic drawing of the shirt in my sketchbook. While studying and noting the measurements in my sketchbook, it gave me the opportunity to study the shirt in a detailed manner. See drawing
Step 2: The Great Rub Off
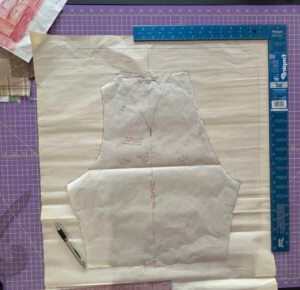
The next step I took was to go back to Jennifer Stern’s notes on The Great Rub Off. I reviewed the notes and pulled out the correct board in my sewing supplies, stretched the original design into a shape that makes tracing easier, and drew around the points in order to form a flat paper pattern.
Step 3: Sew a Muslin
The next step is crucial, yet sewists hate it, often leading to disastrous results. The sewer complains the garment is ill-fitting. Why? Because you need to sew a muslin.
To create a test garment, sew a muslin from cotton matching your final fabric’s weight. The purpose of sewing a muslin is to test the fit and form of the garment. You are now taking a one-dimensional paper pattern and turning it into a three-dimensional object.
Unfortunately, on my first try, the garment looked like crap and didn’t fit me. Now, frustrated, I put the project away for a few days to clear my mind and come up with a different solution.
Step 4: Recognizing the Raglan Sleeve
After studying the garment carefully, and upon further examination and looking through lots of pictures on the internet, I realized the garment design was based on raglan sleeves.
I had to come to this problem from a different angle. I looked through my patterns, whether drafted by me or commercial pattern, and came across a pattern by Simplicity from Mimi G Style 1016.

The pattern diagrammatic on the back panel of the pattern had the exact lines that were on the original shirt. Now I had something concrete that could help me examine the problem.
What I didn’t realize at first is the raglan sleeve is an interesting sewing conundrum because it merges the front and the back sleeve pattern along with the neck pattern.
It wasn’t until drafting the sleeve from the pattern and several YouTube videos, and then redrafting it, that the light bulb went off.
In the sleeve’s figure, you can see my draft and those features of the front and back sleeve and the space where the V is in the pattern is in fact the neckline.
Step 5: Redrafting with My Own Measurements
Now that I understood how the raglan sleeve worked, I could draft the pattern based on the measurements I took. The original shirt was a little large and often slipped off my shoulders. I could use my own measurements to redraft the shirt.
Time for another muslin.
Please note: All of my drafts do not include seam allowances. I add those to the fabric when I am cutting out the muslin or actual garment.

Success!
Here you see the front with no drag lines and cheerful face because now the design issues are working. The muslin shirt matches the original design after altering the pattern.
-
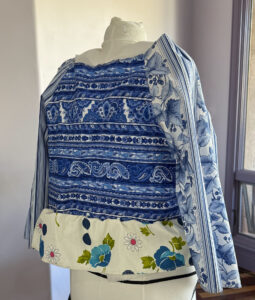
Side view of front shows the bust apex is in its proper place
-
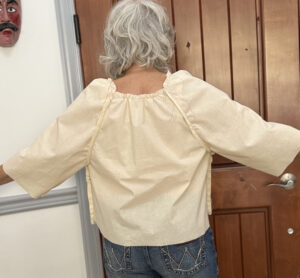
The back view is a better fit than the original shirt, allowing movement, but not so snug that the shirt can’t move.
After several muslins and several trials later, I went back to my fabric stash and found a new version of my shirt. In this new iteration, I wanted to use blue.
Step 6: Sewing the Final Shirt
-
Step 1: Sew the front and back pieces to the sleeve to make sure the blouse fit correctly.
-
Step 2: Add the first ruffle and calculate the difference between the bottom of the shirt and the first ruffle. In my original calculations, the ruffle grows by five inches on each tier. See Schematic above.
I used my serger to attach the ruffles, and turned the differential feed down and it did all the work and attached it with accuracy.

The next steps were to keep adding the ruffles. I made the shirt longer as I am rather tall. I used a rolled hem with metallic thread in the serger, which gave it just the right amount of luster.
The collar and cuffs on the original shirt had large bias binding on them. I replicated this, too, and found some beautiful scraps in my stash.
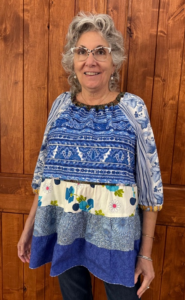

Final Look
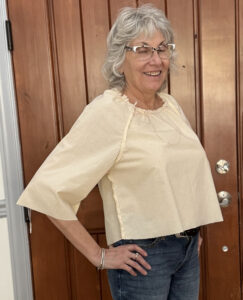
Pictured here is me, ready for a night out on the town wearing my new blouse copied from a Dillard’s ready to wear. Look at the stunning fabric I selected from my extensive quilting stash for the wide bindings and exquisite rolled hem.
Preparing the Materials for Drafting
To copy a shirt, you’ll need several basic materials:
-
A pencil, eraser, T-square, and tape measure
-
Pattern paper or fabric to trace the shirt onto. I prefer the paper from a moving company used to wrap your dishes. It’s inexpensive and the perfect weight for drafting and erasing.
-
Pins or fabric weights to keep the shirt in place. Nancy Tauber uses pins instead of tape and it makes for much better use of the paper.
-
A sharp pair of paper scissors to cut your draft out of the paper
-
Muslin to sew various iterations until the pattern fits correctly
-
Other sewing supplies include pins, thread, a seam ripper, pattern paper, transfer paper and wheel
Note: This shirt needed elastic in the collar binding in order to pull it tight enough around my neck for less slippage.
Step-by-Step Guide: How to Copy the Shirt
-
Lay the Shirt Flat: Start by smoothing out the shirt on a flat surface, ensuring it’s wrinkle-free. This will make your measurements more accurate. This method works great for a shirt that has few details, but not the shirt shown here. Think: tank top, or short sleeve bodice.
-
Trace the Shirt Outline: Using your ruler and pencil, trace the shape of the shirt. Be mindful of the seam allowances, hems widths, and neckline.
-
Transfer the Pattern: Once you’ve traced all sections, transfer the outline to your chosen material. Cut out the pieces carefully.
-
Add Seam Allowances: Don’t forget to include extra space for seams, hems, and darts. Typically, a 1/4″ or 1/2″ seam allowance is sufficient, but adjust based on your project needs.
Note: I add these later depending on the sewing method I will use. I add them with chalk and a ruler before I cut out the fabric. -
Fit and Adjust: After cutting your first draft, you need to test the fit of the garment by making a muslin. This is the time to adjust for a better fit.
Common Mistakes to Avoid
-
Forgetting to add seam allowances, which will cause a tight fit
-
In your first draft, do not worry about tracing anything but the basic shape. For example, in a bodice, the front half and back half of the draft. You will place these on a fold when you make a muslin. Once you get a proper fit of those, you can worry about sleeves, cuffs, and collars.
Conclusion
Copying a garment you already own is a fun way to create custom designs.
With the right tools and techniques, you can easily replicate a shirt and turn it into something basic or creative to suit your personal style.
Based on your own sewing skills, this method is a great way to build a new wardrobe or experiment with your creativity.
If this post inspires you, please show me what you created. Post here or on my Facebook page:
👉 https://www.facebook.com/RobinDSpindt/
If you have any questions, do not hesitate to ask!


